1. Introduction
Foundation Models took a real leap forward after WWDC 2026. Three pieces landed at once, and together they changed what a serious on-device AI feature can look like: the new Evaluations framework, Dynamic Profiles, and Dynamic Instructions. Each is worth a deep dive on its own, and the combination is why Foundation Models is suddenly a hot topic again. This article, however, is about only one of them.
Specifically, it is about how you test a Foundation Models-based feature, using the Evaluations framework together with Swift Testing. That pairing matters, because on its own Swift Testing is not enough. Testing a foundation model with unit tests alone is simply not possible. AI models are non-deterministic, whether they run on-device or behind a remote API. A traditional unit test assumes that the same input always produces the same output; that assumption is the foundation everything else stands on. Generative models break it. Feed the same prompt in twice and you can get two different, both perfectly valid, answers.
Evaluations exists to close that gap. Instead of asserting exact equality, you measure behaviour across a dataset and reason about it statistically, and the rest of this article is a hands-on walkthrough of how to do exactly that.
This article assumes you are already comfortable with the Foundation Models basics,
@Generable,LanguageModelSession, tools. If you want deeper background on Foundation Models themselves, I cover them in detail in my book AI Driven Swift Architecture (Packt), available on the book page of this site.
2. The Five Steps of an Evaluation
First, a hard requirement: the Evaluations framework needs macOS 27 and iOS 27. At the time of writing I am on macOS 27 beta 3 and Xcode 27 beta 3, and this is mandatory, not a nice-to-have. On anything older, none of what follows will compile or run.
With that out of the way, the mechanics are straightforward. To evaluate a feature you create a struct (or a class) that conforms to the Evaluation protocol. That single conformance is what structures everything: it hands you the five steps below, and your job is to fill each one in.
- Define the dataset. These are the input samples you will feed to your feature. You can build the dataset in two ways: manually, by listing the samples yourself, or through synthetic generation, where the model produces samples for you. We will build a real dataset by hand shortly, and cover synthetic generation later in the Growing Your Dataset section.
- Define the subject. The subject is your system under test, the production code that actually calls into a foundation model. This is the step where the evaluation learns how to invoke your real feature, so that every sample in the dataset gets run through the exact code path your users hit.
- Define metrics and evaluators. Here you decide precisely what you are measuring about the model’s output. You pick the metrics you care about, then attach one or more evaluators to each. Evaluators come in two flavours: pass/fail evaluators, which answer a yes-or-no question, and scoring evaluators, which return a numeric score rather than a boolean.
- Aggregate the metrics. This step matters more than it first appears. Running evaluators produces a lot of raw numbers; aggregation is where you explicitly declare which of them you actually want reported and tested, for example the mean of a given metric. If you skip a metric here, it will not surface in your results, no matter how carefully you measured it.
- Wire it into a
@Test. Finally, you tie the evaluation into Swift Testing using the.evaluates(...)trait, so it runs as part of your normal test suite alongside everything else, no separate harness, no special runner.
3. Building a Real Example: TripPlanner
To make this concrete, we will evaluate a small but realistic feature: a trip planner that turns a free-text travel brief into a structured itinerary. Before the evaluation, we need the production code it will test.
One practical note on layout. For this article, the production code and the test code live in the same test target, purely for convenience. In a real project you would typically keep them separate, the feature in your app or a framework, the evaluation in a test target, but that separation is not required for what we are demonstrating here.
We start with the output type, the Itinerary the model is asked to generate:
@Generable
struct Itinerary: Codable {

    @Guide(description: "One plan per day of the trip, in order", .count(3...5))
    let days: [DayPlan]

    @Guide(description: "Total estimated cost for the trip, in USD")
    let totalEstimatedCost: Int

    @Guide(description: "Overall pace of the itinerary")
    let pace: Pace
}

@Generable
struct DayPlan: Codable {

    @Guide(description: "2 to 4 activities planned for this day", .count(2...4))
    let activities: [String]

    @Guide(description: "The main neighborhood or area activities are grouped around")
    let neighborhood: String
}

@Generable
enum Pace: String, Codable {
    case relaxed
    case moderate
    case packed
}
The two .count guides here are deliberate. days is constrained to .count(3...5), and each DayPlan’s activities to .count(2...4). These are exactly the kind of constraints that are easy to state but not guaranteed to hold: the model should honour them, but nothing about a generative model promises it will. That is precisely why they make a good test target. Later, in the TripItineraryEvaluation, we will verify that generated itineraries actually respect these bounds rather than simply trusting the guides.
Next, the feature itself, a thin wrapper around a LanguageModelSession:
struct TripPlanner {

    private let session: LanguageModelSession

    init(
        session: LanguageModelSession = LanguageModelSession(
            instructions: """
                Create a day-by-day travel itinerary for the user's request.
                Group activities by neighborhood to avoid excessive travel within a day.
                """
        )
    ) {
        self.session = session
    }

    func planTrip(from brief: Prompt) async throws -> Itinerary {
        try await session.respond(to: brief, generating: Itinerary.self).content
    }

    var currentSession: LanguageModelSession { session }
}
Notice that planTrip(from:) takes a Prompt, not a String. This is a deliberate choice, and it is what makes the feature easy to evaluate. Each sample in our evaluation dataset is, at heart, a prompt; by accepting a Prompt directly, planTrip(from:) lets us feed those samples straight into the model, one prompt per sample, with no adapter code in between. The shape of the production API and the shape of the dataset line up, which is exactly what we want when we wire the two together in the evaluation.
Defining the dataset
With the feature in place, we can start building the Evaluation conformance itself. Its first building block is the dataset: the input data we will feed to the model. As mentioned earlier, there are two ways to produce it, manually or through synthetic generation. We will build it manually here and come back to synthetic generation in the Growing Your Dataset section.
The manual approach is to declare an ArrayLoader(samples:) built from ModelSample values, each one describing a single test case:
ModelSample(
    prompt: "3 days in Kyoto, moderate budget, love temples and food",
    expected: Itinerary(days: [], totalEstimatedCost: 900, pace: .relaxed)
)
A ModelSample has two properties. prompt is what actually gets sent to the model, the free-text brief in this case. expected is what we expect to get back once that prompt has been applied. This same prompt is later handed to the subject(from:) method so the model can run against it, and it is then the Evaluations framework’s job to compare the actual result the model produced against this expected value.
Defining the subject
The second step is telling the evaluation what feature we are actually testing. That is the role of subject(from:). Here we also pin down the sample type the evaluation works with, ModelSample<Itinerary>, so everything downstream is typed against our Itinerary output.
func subject(from sample: ModelSample<Itinerary>) async throws -> ModelSubject<Itinerary> {
    let planner = TripPlanner()

    let itinerary: Itinerary = try await planner.planTrip(from: sample.prompt)

    return ModelSubject(
        value: itinerary,
        transcript: planner.currentSession.transcript.structuredTranscript
    )
}
Inside, we instantiate our TripPlanner and call planTrip, passing in the sample’s prompt, exactly the value we defined on the dataset side. The result is wrapped in a ModelSubject, which carries both the generated value and the session transcript, so evaluators can later inspect not just the output but how the model got there. One behaviour worth calling out: if the dataset holds multiple samples, subject(from:) is invoked once per sample, once for every prompt in the dataset, so this method runs the real feature end to end for each case you defined.
4. Datasets & the Loader Protocol
In section 3 we handed the evaluation an ArrayLoader and moved on. That works, but it hides something: the dataset property on an Evaluation is not an array at all. It is backed by anything conforming to the Loader protocol, and understanding that protocol is where most of the early friction with the framework lives.
The framework ships three concrete Loader types out of the box. ArrayLoader is an in-memory array, the one we used in section 3, ideal for small, static datasets you write by hand. JSONLoader is backed by a JSON or JSONL file, the right choice when you have pre-generated a dataset and committed it to disk. StreamLoader is backed by a custom async sequence, for datasets you want to produce dynamically at evaluation-run time. Three tools, three jobs: hand-written and small, pre-generated on disk, or generated live.
Gotcha #1: dataset construction can’t be async
The interesting part starts the moment you want a synthetic dataset instead of a hand-written one. Our instinct was the obvious one: generate the samples right where the dataset is declared. Call an async throws generation function directly inside the dataset property and be done with it.
That breaks immediately. A struct’s property initializer is not an async context, so there is nothing to await against, the compiler simply won’t let you. Fine, we thought, we’ll add an explicit init() async throws and generate there instead. That compiles one level down but hits a wall one level up. To attach the .evaluates(...) trait to a @Test, you construct the evaluation as a static let:
static let evaluation = TripItineraryEvaluation()There is no way to await a static let. It has to be constructed synchronously, which means an async init is a dead end too.
The fix is less a trick than a change of mental model. Stop trying to eagerly compute the dataset at construction time. The dataset does not need to exist when the evaluation is built, it only needs to exist when the framework consumes it, and that consumption happens later, in an async context, when the evaluation actually runs. So we defer all the async work to that point.
The StreamLoader pattern
Loader’s single requirement makes this deferral natural. All it asks for is a computed property:
var stream: any AsyncSequence<Self.Sample, any Error> { get }That is synchronous to declare. The async work only happens once something iterates the stream. StreamLoader wraps exactly this shape: you hand it an AsyncThrowingStream, and inside the stream’s closure you kick off a Task that does the real async work, yielding samples as they are produced and finishing (or finishing with an error) at the end.
Here is gotcha #1 fixed, the dataset generated dynamically without ever needing an async initializer:
var dataset: some Loader<ModelSample<Itinerary>> {
    StreamLoader(
        stream: AsyncThrowingStream<ModelSample<Itinerary>, Error> { continuation in
            Task {
                do {
                    let initialSamples = [
                        ModelSample(
                            prompt: "3 days in Kyoto, moderate budget, love temples and food",
                            expected: Itinerary(days: [], totalEstimatedCost: 900, pace: .relaxed)
                        )
                    ]

                    for try await sample in initialSamples.makeSamples(
                        Prompt("Generate realistic list of itinerary for a trip"),
                        targetCount: 20,
                        validator: { sample in
                            guard let itinerary = sample.expected else { return false }
                            return itinerary.days.count > 0
                        }
                    ) {
                        continuation.yield(sample)
                    }
                    continuation.finish()
                } catch {
                    continuation.finish(throwing: error)
                }
            }
        }
    )
}
The makeSamples call in the middle is what expands our single seed sample into a fuller dataset synthetically. Don’t worry about its parameters for now, we cover how that generation actually works in the next section. What matters here is only the shape: the dataset property is declared synchronously, but the moment the framework iterates the stream, the Task runs, awaits freely, and streams samples back through the continuation. The async problem simply disappears because nothing async happens until iteration time.
Gotcha #2: any Loader<Sample> vs some Loader<Sample>
There is one more trap on the way here, and it produces a genuinely baffling error the first time. Apple’s own documentation examples type the property as an existential:
var dataset: any Loader<ModelSample<String>> { ... }Copy that pattern literally and the compiler rejects the whole type:
Type 'TripItineraryEvaluation' does not conform to protocol 'Evaluation'
Unable to infer associated type 'SampleLoader' for protocol 'Evaluation'
The error points at conformance, but the real cause is the any. Evaluation has an associatedtype constrained to Loader, and an existential (any Loader<...>) cannot satisfy an associated-type requirement. When all the compiler sees is a boxed existential, it has no concrete type to bind SampleLoader to, so inference fails.
The fix is a single word: use some instead of any.
var dataset: some Loader<ModelSample<Itinerary>> { ... }some is an opaque type. The compiler still knows the real underlying concrete type, StreamLoader<ModelSample<Itinerary>> in our case, and can infer the associated type from it with no ambiguity. This is exactly why the snippet above is typed some Loader<ModelSample<Itinerary>> and not any, that one keyword is the difference between compiling and a wall of associated-type errors.
5. Growing Your Dataset: Synthetic Sample Generation
In the previous section we glossed over the makeSamples call sitting inside the StreamLoader. That call is where a single hand-written sample turns into a full dataset, so it deserves a section of its own.
Writing evaluation samples by hand gives you tight control over quality, but it is slow and narrow. You end up testing only the handful of cases you happened to think of, which is rarely a fair picture of how your feature behaves in the wild. Letting a model synthetically expand a small, manually-curated seed set buys you much broader coverage, and coverage is exactly what you want when the thing you are testing is consistency and output quality across a wide range of inputs.
It is worth being clear that this is a deliberate trade-off, not a shortcut. You still start from a real, human-authored seed dataset. Synthetic generation expands that seed; it does not replace it. The quality of what you generate is only ever as good as the examples you seed it with.
Walking through the makeSamples call
Here is the specific call from the StreamLoader in section 4, pulled out on its own:
for try await sample in initialSamples.makeSamples(
    Prompt("Generate realistic list of itinerary for a trip"),
    targetCount: 20,
    validator: { sample in
        guard let itinerary = sample.expected else { return false }
        return itinerary.days.count > 0
    }
) {
    continuation.yield(sample)
}
continuation.finish()
The first argument, Prompt("Generate realistic list of itinerary for a trip"), is the generation prompt. It tells the model what kind of samples to produce, using the samples already in initialSamples as worked examples to imitate.
targetCount: 20 sets the total size of the resulting dataset, seed samples included, not the number of new samples to add. Because we started from a single manually-written sample, this call generates up to 19 new synthetic samples to reach a total of 20.
The validator closure runs once per generated sample and is your last line of defense. Return true to accept a sample, false to reject it. Here we reject any sample that is missing an expected value, or whose expected itinerary has zero days, a sample like that carries no useful signal for evaluating our feature, so there is no point letting it into the dataset.
Finally, makeSamples returns an AsyncThrowingStream, which is exactly why we can drive it with for try await and forward each accepted sample straight into our own stream via continuation.yield(sample). The two async sequences are chained together: generation produces samples on one end, our StreamLoader re-emits them on the other. continuation.finish() signals that generation is done and our stream is complete.
A quick word on manual review
A validator only catches structural problems. It is still worth spot-checking generated samples by hand, watching for outputs that are subtly misclassified, category imbalance where the model over-represents one kind of case, and semantic duplicates that say the same thing in different words. In short: the validator automates the structural checks, but it does not replace a human sanity pass before you trust the dataset for evaluation.
A practical caveat: generation speed
One honest note from building this. Generating a full targetCount: 20 batch turned out to be very slow, slow enough that it was not really practical to run during testing. I can’t say for certain whether that is a bottleneck specific to my machine or a rough edge in the Evaluations framework itself, which is still in beta, so I won’t call it a bug. It is simply something to be aware of. If you hit the same wall, start with a smaller targetCount while you iterate on the evaluation, and only scale it up once the rest of your setup, subject, evaluators, and aggregation, is working correctly.
Choosing which model generates your dataset
makeSamples also accepts a sessionProvider closure, which lets you control which model actually performs the generation instead of relying on the default. That matters, because it means you are not limited to the on-device model. You can route synthetic generation to the new server-side PrivateCloudComputeLanguageModel, introduced at WWDC 2026, when you want more reasoning power or a larger context window for producing your samples:
sessionProvider: {
    LanguageModelSession(
        // Use the Private Compute Cloud model to generate samples.
        model: PrivateCloudComputeLanguageModel(),
        instructions: """
            You create new travel itinerary evaluation samples. Generate realistic \
            trip-planning requests based on the examples provided. Each item needs a \
            natural prompt, a realistic day-by-day plan, an accurate total estimated \
            cost, and an honest overall pace.
            """
    )
}
This is a trade-off of its own: Private Cloud Compute gives you a bigger, more capable model for generation, at the cost of a network round-trip instead of staying fully on-device. For the full picture on PCC, Apple’s WWDC 2026 session Build with the new Apple Foundation Model on Private Cloud Compute is the place to start.
6. Evaluators & Metrics
We have a dataset and a subject. Now comes the part that decides what “good” actually means: the metrics we measure and the evaluators that produce them. Here is the whole block, which we will unpack piece by piece below:
// 3.1 - define metrics

let daysCount = Metric("DaysCount")
let activitiesPerDay = Metric("ActivitiesPerDay")
let budgetWithinTolerance = Metric("BudgetWithinTolerance")

// 3.2 - define evaluators related to metrics

var evaluators: Evaluators {

    Evaluator { (_, subject: ModelSubject<Itinerary>) in
        let subjectDaysCount = subject.value.days.count

        return (3...5).contains(subjectDaysCount) ? daysCount.passing() : daysCount.failing(rationale: "\(subjectDaysCount)")
    }

    Evaluator { (_, subject: ModelSubject<Itinerary>) in
        let activitiesPerDaySatisfied = subject.value.days.allSatisfy { (2...4).contains($0.activities.count) }

        return activitiesPerDaySatisfied ? activitiesPerDay.passing() : activitiesPerDay.failing(rationale: "\(subject.value.days.map(\.activities.count))")
    }

    Evaluator { (dataSet: ModelSample<Itinerary>, subject: ModelSubject<Itinerary>) in
        guard let expected = dataSet.expected, expected.totalEstimatedCost > 0 else {
            return budgetWithinTolerance.ignore()
        }

        let budgetErrorPourcentage = abs(Double(subject.value.totalEstimatedCost - expected.totalEstimatedCost)) / Double(expected.totalEstimatedCost)

        return budgetWithinTolerance.scoring(budgetErrorPourcentage)
    }
}
Why these three metrics
We measure three things: daysCount, activitiesPerDay, and budgetWithinTolerance.
daysCount checks that the model actually respects the day-count range we asked for. This is worth stating plainly: even though the days property carries a @Guide(.count(3...5)) constraint from section 3, that guide does not give you a hard, 100% guarantee that the model stays inside the range every time. It usually will, but “usually” is exactly the failure mode a test should catch, so we write a dedicated metric to flag it if it ever drifts.
activitiesPerDay does the same job one level down, verifying that every day holds between two and four activities.
budgetWithinTolerance is the most business-critical of the three. If this feature ships, getting the estimated trip cost roughly right actually matters to a user. But some error margin here is unavoidable: you can’t be fully confident in your own expected reference figure, nor in the model’s real-world estimate. So rather than demand an exact match, the evaluation accepts a tolerance, up to 30% error in our case, which we enforce later in the aggregation step. This metric’s job is just to compute how far off we are; deciding whether that distance is acceptable happens downstream.
How an Evaluator is actually shaped
The evaluators property groups several Evaluator values together. You list them one after another with no commas between them, similar in spirit to how SwiftUI’s ViewBuilder lets you stack several views inside a body.
Each Evaluator wraps a closure that receives two things: the original dataset sample, which carries expected, and the subject, the wrapped output your feature under test actually produced. Not every evaluator needs both. The first two, daysCount and activitiesPerDay, deliberately ignore the sample, their first parameter is _, because all that matters is whether the subject itself lands in the expected range, regardless of what any particular sample expected. The third, budgetWithinTolerance, genuinely needs expected: its whole purpose is to compare the expected cost against what the subject produced and compute an error percentage between the two.
Note the guard in that third evaluator. If expected is missing, or if expected.totalEstimatedCost is 0, which would blow up the division that follows, the evaluator bails out with .ignore() instead of scoring something meaningless. Ignoring a sample is a first-class outcome here, not an error.
Reading the result: passing, failing, scoring, ignore
The mental model is simple. If the evaluation is good, you call the metric’s .passing(), or .scoring(_:) when you want to report a numeric value rather than a boolean. If it isn’t, you call .failing(rationale:). And when a sample can’t be judged at all, .ignore() takes it out of the running entirely.
The rationale argument deserves a callout. It lets you attach the actual value the subject generated, purely for debugging, the offending day count, the array of activity counts, whatever explains the failure. That rationale is what surfaces when you inspect the new “Evaluations” entry that appears under “Tests” once you run your suite. It is how you diagnose why a given sample failed rather than merely learning that it did, which, with non-deterministic output, is the difference between a useful test and a frustrating one.
7. Aggregating Metrics
Defining a Metric in section 6 is not, on its own, enough for it to appear in the evaluation report. Each metric has to be explicitly passed through a MetricsAggregator, and that happens in aggregateMetrics(using:):
// 4 - aggregate the metric summary

func aggregateMetrics(using aggregator: inout MetricsAggregator) {
    aggregator.computeMean(of: activitiesPerDay)
    aggregator.computeMean(of: daysCount)
    aggregator.computeMean(of: budgetWithinTolerance)
}
Here we call computeMean(of:) once per metric, activitiesPerDay, daysCount, and budgetWithinTolerance, computing the mean value of each across every sample in the dataset.
The gotcha is easy to miss: if you forget to aggregate a metric here, it simply falls out of the final test plan. It won’t just be absent from the report, it won’t be available at all. Even if, later in your test, you try to read that metric’s value, it won’t be there, because it was never aggregated in the first place. Aggregation isn’t optional bookkeeping you can skip and revisit later; it is the step that makes a metric usable at all.
8. Running the Evaluation & Reading the Report
Everything from sections 3 through 7, the subject, the dataset, the evaluators, the aggregation, comes together in a single @Test:
struct TripItineraryTests {

    static let evaluation = TripItineraryEvaluation()

    @Test(.evaluates(Self.evaluation))
    func itineraryGeneration() async throws {
        let result = EvaluationContext.current.result

        let daysCountRate = result.aggregateValue(.mean(of: Self.evaluation.daysCount))

        let meanBudgetError = result.aggregateValue(.mean(of: Self.evaluation.budgetWithinTolerance))

        let activitiesPerdayRate = result.aggregateValue(.mean(of: Self.evaluation.activitiesPerDay))

        #expect(daysCountRate == 1)

        #expect(activitiesPerdayRate == 1)

        #expect(meanBudgetError <= 0.30)
    }
}
The .evaluates(...) trait on @Test takes your evaluation instance as its parameter, and that is what actually drives the whole run: it executes the subject against every sample in the dataset, runs the evaluators on each result, and aggregates the metrics. By the time the test body starts executing, the heavy lifting is already done.
To read the results back out, you go through a result object: let result = EvaluationContext.current.result, an EvaluationResult. From there, aggregateValue(.mean(of:)) gives you the mean of any metric. One thing worth calling out: you can query the aggregate value of any Metric, even one you never listed in aggregateMetrics(using:) back in section 7. That method isn’t a gatekeeper for what you’re allowed to read afterward; it only controls what gets pre-computed for the report. Querying here and aggregating there are two independent things.
The three assertions then read straight from those aggregates. daysCountRate is the mean of daysCount, a pass/fail metric, so a value of 1 means every sample stayed inside the 3–5 day range; we assert exactly that with #expect(daysCountRate == 1). activitiesPerdayRate does the same for the two-to-four-activities rule. meanBudgetError is the mean of the scoring metric budgetWithinTolerance, and here we don’t demand perfection, we assert #expect(meanBudgetError <= 0.30), encoding the 30% tolerance we settled on back in section 6.
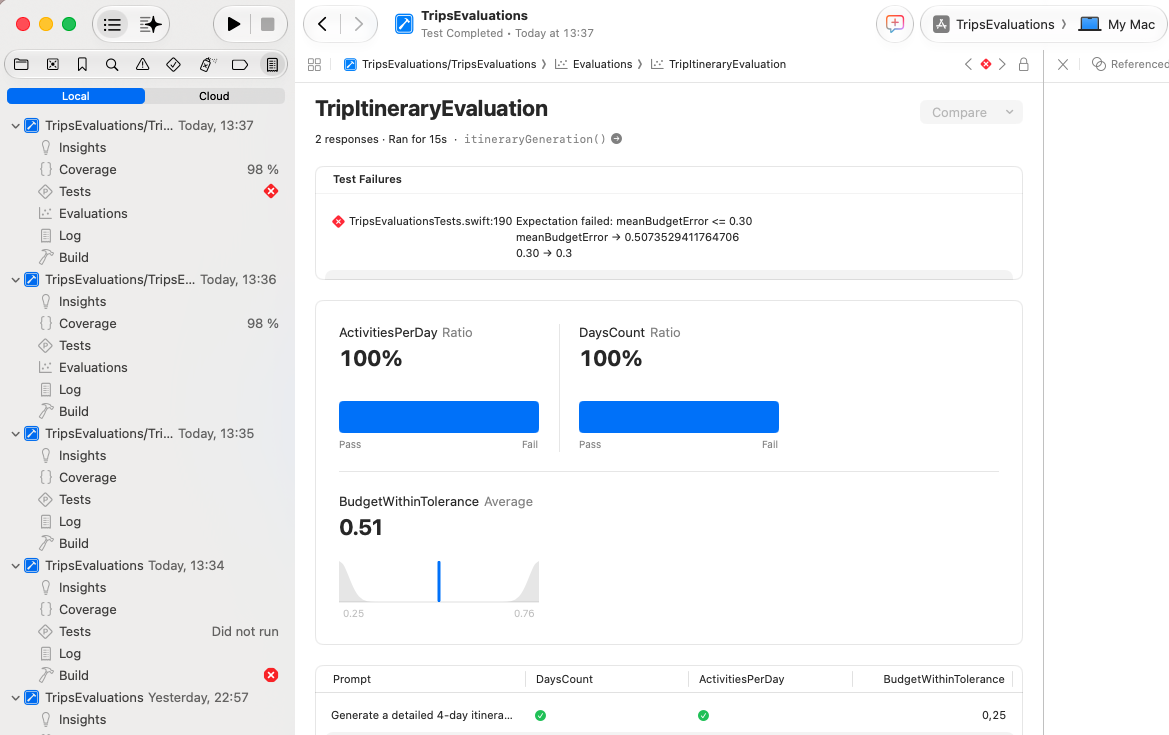
Running the suite surfaces a brand-new Evaluations report for TripItineraryEvaluation, here covering 2 responses, run in about 15 seconds. And notice the outcome at the top: the test actually failed, meanBudgetError <= 0.30 did not hold, because the real mean came out to roughly 0.51 (51%), well above the 30% tolerance. Below that sit the per-metric summary cards: ActivitiesPerDay and DaysCount both report a 100% pass ratio, while BudgetWithinTolerance averages 0.51, with a distribution chart showing individual sample results spread from 0.25 all the way up to 0.76. Underneath, a per-sample table (Prompt / DaysCount / ActivitiesPerDay / BudgetWithinTolerance) breaks out each dataset sample’s individual result, the raw data behind the aggregates above. This is exactly the pattern the evaluation was built to expose: the structural constraints, day count and activities per day, are the kind of thing the model respects reliably, while an open-ended numeric estimate like total trip cost swings widely from sample to sample. And in this run, that swing was large enough to fail the test for a completely legitimate reason.
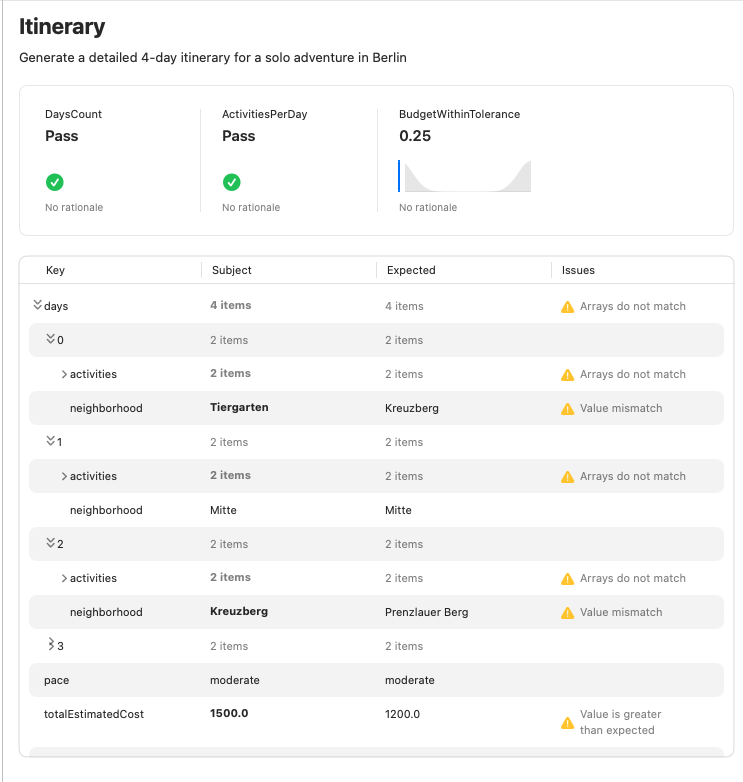
Drilling into a single row opens up where the report really earns its keep. Here we’ve selected the “Generate a detailed 4-day itinerary for a solo adventure in Berlin” sample. At the top are the same three metrics scoped to this one sample: DaysCount and ActivitiesPerDay both pass, and BudgetWithinTolerance scores 0.25. Below that is the genuinely useful part: an automatic field-by-field diff between Subject, what the model actually generated, and Expected, the reference value from the dataset sample, flagging precisely where the two diverge. In this case it calls out a neighborhood mismatch, the model’s “Tiergarten” against an expected “Kreuzberg”, and a total estimated cost that came in high, 1500.0 versus 1200.0, marked as “Value is greater than expected”. The point to take away is that all of this comes for free: you get a structured, field-level comparison of generated versus expected output without writing a single line of custom diff logic.
9. Watch the Series
This article is part of an ongoing AI Evaluations series. If you’d rather see the whole thing summarized end to end, I’ve put together a video walkthrough on the Swift with Walid YouTube channel.